This post is an entry for the Simplicity Sewing Challenge
I have always loved sewing - especially dress making I love to make dresses. There is something inherently fun about making dresses. I went to my local fabric shop to get a new pattern for a dress to wear to my friend's wedding. I usually go for simplicity patterns because they are straight forward and have good instructions. As I was browsing through the patterns with my mum we came across a flyer for the simplicity sewing challenge. I was intrigued and we read it and mum convinced me to enter. I sent off for the pattern it looked challenging but I was confident. I have been making dresses for years and I like to adapt patterns to suit my style. Whilst I was waiting for the pattern to come I was making that other dress for a friends wedding when Svetlana; my electric machine (Svetlana she is a huskvana viking so needed a Scandinavian name) decided that it wasn't going to sew any more after 8 years loyal service with only the sleeves and hem to go.
So out came the 1951 singer - this machine was bought in 1951 by my grandma to make her wedding dress on so I call her after Grandma Doris. I didn't think too much of Svetlana dying until the pattern arrived for the challenge. It was the most complicated pattern I had ever seen and I just had Doris as my trust sewing steed.
Sometimes you get that project that you have to do - or you want to do but it just seems beyond your skill set or circumstances. In this post I want show you that you can still do that project even when everything seems like its not going to happen.
My finished dress!
1. Know the challenges and strengths of the project.

Whether it is you or your tools, there are limitations and strengths in everything you have to work with , I am not saying don't challenge yourself or learn new skills because you should but know your strengths and limitations after all the Bayeux tapestry wasn't sewn in a day.
Doris my 1951 singer does straight stitch and only straight stitch and the zipper foot makes the tension go off and usually takes a good hour of fiddling to get it back afterward so any invisible zips or complicated zips were out the window. It also meant I would have to use pinking shears rather than zig zag stitch to stop fraying and any thought of satin stitch applique or button holes are gone straight away.
This challenge was to give your take on the pattern. I couldn't do the invisible zip but I could do a concealed zip using the ordinary foot.

If a dress looks like a complicated make don't make things harder for yourself with a large print or super slippery fabric. Pattern matching isn't that hard - it just requires thinking through where the pieces go and what your seam allowances are. But with a dress like this one which requires tailoring and finesse and has pieces cut at strange angles it is best to pick either a plain fabric or one which doesn't require matching.
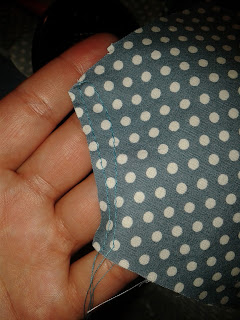
I chose this bluey/green dotted cotton.
2. Organise yourself!
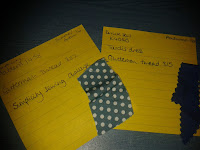

Yup there is nothing worse than getting half way through the project and loosing the zip you bought for it or forgetting your cotton number when you run out. This may even make a panic about something else become a major- try to keep organised so that your stress level will be at a minimum.. I keep everything in this handy pouch during my current project - spare thread, notions and small fabric bits for testing tension. I also have a sticky note in my handbag with a swatch and the thread number just in case I need to get more things for it. when I am finished with the project it gets stuck to the outside of the pattern so I know what I used last time. should I make it again.
3. Think creatively yet practically

When I start a project I like to sketch it up so I know what I am aiming for. The sleeves didn't suit my style and we live in England so I like to have sleeves because well if you don't you will always either need a cardi or sun cream. I am good at sleeves and zips they are my favourite bits of a dress.
I took the two pattern pieces for the sleeve and using the markings of the pattern made one continuous piece. I used a gather at the top of the sleeve to help ease it in to being the right size for the pattern. do not be afraid to edit patterns to suit your style. its not as hard as it looks and if you are really worried do a toile. ( a toile is like a mock up in cheap fabric to see how it goes.)
As we learned from the Doctor who Christmas special with Donna noble - all dresses need pockets. a concealed pocket is one of my favourite additions to a dress because I like to have somewhere to put my tissues at a wedding so I can cry or put a train ticket in so you don't have to empty out your handbag during the journey. Most people would look at a pattern for a competition and think - no I will keep it simple lets not deviate- but adding a concealed pocket is a simple addition to any dress and it looks a lot more complicated than it is which is always a bonus.
4. Read the pattern carefully; twice before you cut any of the pieces out!
We from the heart kind of sewers often think of the instructions as optional extras for those who like the pernickityness of sewing. Ok you are out of your depth here - or are you? when I first saw the pattern I thought I was out of my depth - after reading it through it is actually more straightforward than it looks.
5. Have good foundations in place.
From choosing a fabric that is easy to handle to making sure you cut it out accurately. Make sure your foundations are right before you do the harder things.
 |
| Stay stitching is not a step to miss ! |
Most patterns I like to copy onto greaseproof paper as I have struggled with my weight in the past it is nice to have the pattern as a reference so the bodice and facings get traced and a pattern is flimsy and can get ripped easily in pinning and the lines overlap making it hard to see what you are actually cutting out. I use Greaseproof paper this stuff is only £1 for 5 meters and it is fantastic on a hard surface and a permenant marker copy and cut the pattern pieces out accurately making sure your markings are right especially making sure your markers are done outward not inward.
 |
| Mark outward never inward. |
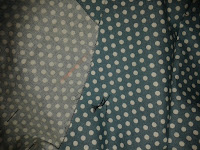
Pattern markings are more important than they look tailors tacks and lines are useful for making sure you are getting things straight. This pattern 1458 hangs interestingly and unless you cut the pieces out at the right angles your fabric's pattern will go everywhere! I used the dots on my fabric as a guide to the grain making sure my grain line followed the dots. Always do the stay stitching on the neckline else it will warp. It is always the first thing to do. I do it whether or not the pattern says to because it makes your life SO much easier later on.
6. Take it one step at a time.
This means don't get overwhelmed by the whole dress. - just do a seam or two at a time. Take each step as it comes from the seams to the sleeves. sometimes once you have done the seams the pattern starts to make more sense. if it helps you write a list of what you have to do next then tick it off.
7. If in doubt tack.
 |
Tailor's chalk and tailor's tacks
are important markings |
Some patterns tacking is called basting. I remember the first time I read basting on a pattern I thought - it is a dress not a turkey - why would I do that! turns out Americans call tacking basting. if you get to a hard bit - tack in a contrast colour. that way you won't have to worry about pins or you can try it on before you do it. For a dress that is really tailored like this one tacking helps to get it right before you actually sew it. The only time I wouldn't tack would be if I was using leather or a fabric that every needle mark makes a mark. Cotton is quite forgiving with an unpicker.
8. Sometimes the pattern is wrong.
 |
| I feel it is a neater finish - what do you think? |
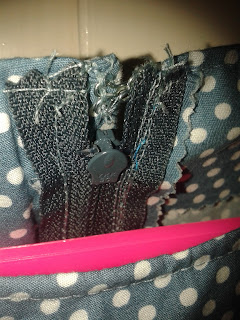
Ok I say this sparingly and with caution. the pattern makers are human. they are brilliant but they are human. sometimes you have to do things in a different order than to what they think because your experience or logic says no. The pattern said - back seam, zip then neck facings. This is a bad order and this is why; the zip has a seam allowance, if you do it first when you do your facing you will be left a bit over at the zip of facing that you will have to do something with because the facing includes the seam allowance for the zip. it is better to do the first part of the facing then the zip then the back bottom seam then when it is all sitting right then you press the facing and top stitch. this way all your ends are neatly tucked in and the zip looks like it should be there rather than added on. This is where your experience as a sewer comes in, to not blindly follow a pattern, this comes with time and if you make a mistake its not the end of the world.
9. Don't give up!

There was at least one point in this make I wanted to throw the whole thing in the bin. seriously. It was not playing ball and though I had cut it accurately and I had measured myself somehow the tailoring would not submit. I shouted at it until I felt better, Of course that didn't do much, but as my mother said - you have got this far why would you give up now. I took a step back and worked it out that it was actually the back seams I needed to take in not the front and it was perfect and the dress' style on the front was supposed to hang like it did even though it wasn't flattering to my figure, so a ribbon belt was in order.
 10. Remember no one can see the inside of the dress.
The outside matters, top stitching perfect - don't catch a seam but if you accidently nick the top of the pocket there is no one going to know except you. - enjoy your sewing and don't stress. We that sew from the heart know that what is important is that you enjoy the process. What does it matter if there are imperfections. we have had fun in the process! did you notice on my zip picture I missed a tack... yup - no one is going to see that! Except perhaps you, well you won't tell will you?
So the dress was made and in the end I was quite pleased with it. I learnt so much doing this project and I hope that this post inspires you all to have a go at something a bit challenging. Take a deep breath!
 So since January this year I have lost a lot of weight. I dropped from a big size to a normal size. this meant I had to overhaul my wardrobe. Most of the old clothes ended up in the charity shop but a a pairs of jeans now have a new life as my craft apron. Upcycling is one of my favourite things to do. One leg is cut out and makes the body of it and the other is in strips sewn together as the ties which tie into a belt loop at each side of my waist. the back bottom area is now a pocket and it is all hemmed off. I used part of the waistband to add an embellishment at the top with a big button I found. Now I can protect my clothes as I craft.
 This pair of jeans got a hole in the upper leg region in stead of throwing them I used some of the lower leg to fill in the gaps and make a skirt out of it. I liked the ripped look on the bottom hem. the back had to be longer than the front so it looked even when I wore it. Although nowadays I don't wear this as it is too skimpy but when I made it whilst I was at uni it was awesome.


